Perfectly Puzzled

If the old puzzle has lost some pieces, use it as an opportunity for art!


These magnets were created from those larger children’s puzzle pieces, which I coated with a layer of acrylic paint. 
Raised textured images and words are created by stamping the image and dusting it with embossing powder. Heating the powder melts it, leaving raised images that pop! 

Puzzle edges are inked to create extra depth. Vintage images, beads, wire, buttons, and ribbon lend interest and charm. 
Glue a magnet to the back and you've just recycled and given new meaning to an old object.

Q: What do you create when you’re puzzled with life?


You might also like:

Cheeky Aprons

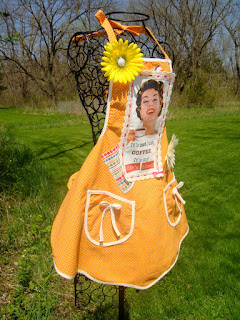
Get ready for a cheeky Mother’s Day!  Today I put a saucy twist on an iconic accessory of motherhood: the apron. These altered aprons bloom with color and verve this early spring. 
vintage ad images are cropped, paired with a sassy saying, and inkjet printed on special fabric

I have the fondest memories of my Granny wrapping one of her many beautiful aprons around my little waist as we prepared to make chocolate chip cookies. With her tender way, she made it such a loving and lovely ritual.


And yet I also grew up in a time when my mother couldn’t secure her own small bank loan simply because she was female, even though she brought in her own steady paycheck. Thankfully that shifted while I was growing up.


These aprons reflect a bit of the spicy dichotomy many women experience: a 'pull' toward and celebration of the nurturer’s role, and a 'push' away from being confined and solely defined by it. Added is an ode to the caffeine it often takes to be able to manage it all.


Perfectly sassy, these women bring out a playfulness when it's time to break out the nurturer!


Q: Speaking of caffeine, what's your favorite vice? Speaking of sass, when are you apt to be a bit cheeky?  
edit: you might also enjoy my:


Healing Grace

This week found my creative energy going into prayers and visualizing a successful surgery for a loved one. Thankfully all turned out well for him! 

stamps: Paper Inspirations (World Map), Inkadinkado (clock, wings); vintage image
I felt connected and productive while lovingly crafting this card. The sports reference and symbolism of 'being on top of the world' was the perfect fit for him. 

In 'real life' this card has lots of depth. You can add dimension to cards in several ways. Glue dots literally raise the clock and football player elements. A brad creates a shiny raised center for the timepiece. A bit of sparkle on the wingtips provide lift.


Stamped letters are cut out and the edges are inked for dimension. You can also see two different background papers. The top one has a torn edge for texture that is then chalked for an aged effect.


 Color pencils make the main stamped globe seem round instead of flat. Finally, all four edges of the card are inked for an aged and dimensional effect. 

Art is a way for me to express my love and gratitude.  Despite a stressful week and the fact that sometimes life causes us to fumble, there are so many things to be grateful for. Loved ones. Skilled surgeons. Ministers. Friends. The opportunity for another day...

Q: What are you grateful for? 


Thank you for visiting.

Here Comes Peter Rabbit!

I was absolutely mesmerized by adventures of Peter Rabbit when I was little.  Drinking in every nuance of Beatrix Potter’s watercolor illustrations as my parents read, I fell in LOVE with those bunnies and remain so to this day!
Today’s art uses a rubber stamp you’ll recognize from the previous entry: three little rabbits who call to mind Flopsy, Mopsy, and Cotton-tail.

These sweet little Easter cards are super simple to make. The same rubber stamp takes on a new look when you crop and layer it with background papers cut to look like postage stamps. Itty bitty pompoms make adorable little tails—just like Beatrix’s.  I made a whole bunch of these a couple of years ago and they sold out immediately!

By the way, if you haven’t seen it, I would highly recommend the movie Miss Potter with Renee Zellweger. I came away with even more admiration for Beatrix Potter, who published The Tale of Peter Rabbit in 1902. She’ll inspire you to dare to trust and express your creativity!

Q: What books did you love as a child?

Thanks so much for visiting!


Green Gratitude Celebration

Earth Day is just around the corner and what better way to express creativity than by using recycling in a project?  
stamp used: Paper Inspirations ('world map'); vintage image.
Since Easter is also around the corner, this project gets three birds—or rabbits—with one box.  An old jewelry box gets a new life with a layer of dark green paint. A layer of lighter green paint mixed with glue gives that wonderful cracked effect when it dries. Edges were inked in white.
stamp used: Brother Sister Design ('winter bunnies')
A sentiment clipped from a magazine is smudged with green and yellow inks to blend with the box. 
A teabag tag (I love Yogi Tea) affixed with a fancy brad provides a sage summation.
The additional joy of romping about on a beautiful weekend among blooming flowers and budding bushes while playing with camera angles was the perfect creative finale. 
And now, without having to print a thing, I can share the photos with you!


I'm so grateful for sunshine and the creative variety of life on this planet. To express my appreciation, I've been an avid recycler for decades, and try to dream up ways to reuse things.

Q: What are you grateful for? And while you're at it, tell us about a creative new use you found for an old object...

Thank you for visiting!


Spring Has Sprung "Quickies"

Ornamental trees are blooming along with the daffodils, making my mind and feet want to wander among them. 
Stamps used: Hero Arts (tree, spring words), Anna Griffin (flourish, tulip), Stampendous (cherry blossom), Stampabilities (swirly butterfly)

These simple cards celebrate the light, uplifting, openness and promise of spring. The tree with blossoms is obviously a stamp, but so are all the images behind it. Using several spring stamps and dark lavender ink, I just randomly stamped an 8 ½ x 11 lavender sheet of paper. Cut it down to the sizes needed for the cards, layer  with coordinating paper, and voila! 

This is truly a quick way to make several beautiful cards at once with very minimal supplies and no experience necessary. Great for newbies, or for those times when you need a quick, last-minute card, or when you want to hurry outside to tiptoe through the tulips! 

Does this super simple, ‘unintimidating’ technique entice you to want to try something new?

Q:  Think of a time you did try something new (in any area of life!) and tell us what led you to say, “I want to try that!”

Thank you for visiting! I love your comments and my hope is that we can learn from and inspire one another.

Celebrate With Style

When I was in 2nd grade, our teacher had us make crowns with glitter and color paper to wear on our birthday.  I LOVED those crowns. 
Sewing project: birthday crown made of fleece
Unfortunately, I shared my birth date with a boy and we were teased all day for being ‘married’ as ‘king and queen.’ A little older and that would’ve been fun; at the time it was just embarrassing. Oh well.  

she's too cute to show!
I still loved the crown and just had to make a fabric version for a dear wee one in my life who turned one year old this week!  I wanted to bling this baby up. But, worrying about choking hazards, I consoled myself with the thought of another chance when she’s older.

A few years ago, I made a grown-up version to celebrate a friend who had helped found a fabulous program. For this one, I recycled a pizza box, cutting it to shape, adding layers of fancy papers, varnish, and doodads until it became a regal ‘sculpture.’

3D Collage: papers, stickers, ribbon, foil, stamps, doodads

     I think a crown every now and then is a mandatory accoutrement—don’t you?


     Speaking of 2nd grade: remember when we had no fear and knew ourselves as creative artists? That was wisdom!


   Glitter, crayons, glue, daisy chains… okay, some of us ate the glue, but I think those were budding gourmands.


Q:  Share with us: when’s the last time you created fearlessly like a second-grader? What would help you do that again?

Snoopy is no April Fool...

…but he does have a surprise for you! Can you guess what gift is hidden in this card? 
Stamps used: Stampabilities "Snoopy Flying High" & Inkadinkado (sun)


Pull on snoopy in his plane and watch him zoom away from the clouds, streaming a banner of the places he’s visited. Voila!  It’s a bookmark! 

Inkadinkado (postmarks), Stampabilities (stamp)
 Snoopy landed me as a published artist. I submitted him along with two other cards in the Stampler’s Sampler ‘bookmark card challenge.’ It was the first time I ever submitted anything for publication. About 5 months later, two of my cards were returned rejected. And, as snoopy hadn’t been published in the slated issue, I assumed he was lost in the mail. Then, about a year after I submitted him, I received notice we’d be published in the Catch Up issue. What a thrill!! (My husband can testify to the prolonged happy dance.)

Thinking about my nephews inspired me to create this card, which is why I think it turned out so cute. (Thank you, boys!) I like when my heart is connected to an inspiration--the work takes on an added dimension.

It still makes me smile to think I was published on my first try. Lessons learned: be playful, take chances, don't buy into labels. I’m not a trained artist, I haven’t taken any stamping classes, and I really didn’t know what I was doing--but I knew I was having fun. Moral of this April 1st story: don’t be fooled into limiting yourself and your creative expression—if you like what you’re doing, put it out there!

I'm curious about a time when you put your creative expression 'out there.' What did you learn through the process?